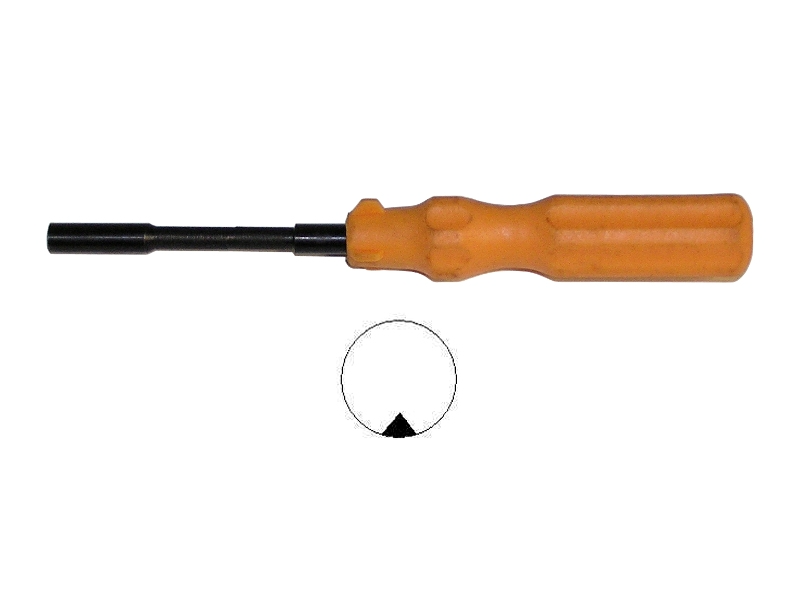
Grass Strimmer
Grass Strimmer
Petrol Strimmer Products

How do I start my Petrol Strimmer
Quick Answer
Starting a petrol strimmer correctly depends on whether the engine is cold or already warm. For a cold engine, prime the fuel system, apply full choke, and start the engine before moving the choke to the run position. For a warm engine, the choke should normally remain in the run position.
Before starting, ensure you are using fresh fuel mixed to the manufacturer's recommended ratio.
⚠️ Safety Notice
Before starting your petrol strimmer:
- Read the user manual and ensure you are familiar with all controls.
- Wear suitable personal protective equipment (PPE), including eye protection, hearing protection, gloves, and sturdy footwear.
- Ensure the cutting head is clear of people, pets, and obstacles.
- Check that the cutting attachment is fitted securely and rotates freely.
- Never start the machine indoors or in an enclosed area.
Cold Start Procedure
Use this procedure when starting the engine for the first time of the day or after the machine has been unused for an extended period.
Step 1: Position the Machine
Place the strimmer on a flat, stable surface free from grass, stones, or other debris.
Support the machine using the engine housing and safety guard.
Step 2: Set the Start/Stop Switch
Move the Start/Stop switch to the START position.
Step 3: Prime the Fuel System
Press the primer bulb approximately 7 times, or until fuel can be seen flowing through the bulb and no air bubbles remain.
This fills the carburettor with fuel and makes starting easier.
Step 4: Apply Full Choke
Move the choke lever to the Full Choke position.
Indicator: Horizontal line
This reduces airflow and provides a richer fuel mixture for cold starting.
Step 5: Pull the Starter Cord
- Hold the machine securely using the rear handle.
- Pull the starter cord slowly until resistance is felt.
- Pull firmly and smoothly 3–4 times.
The engine should begin to fire or briefly run.
Step 6: Move to Half Choke
Once the engine begins to fire:
Move the choke lever to the Half Choke position.
Indicator: Diagonal line
This allows additional airflow while the engine continues warming up.
Step 7: Start the Engine
Pull the starter cord again until the engine starts and continues running.
Step 8: Warm Up the Engine
Allow the engine to idle for approximately 30 seconds before operating the throttle.
On many models, pressing the throttle trigger will automatically return the choke to the Run position.
Warm Start Procedure
Use this procedure when restarting the machine shortly after it has been switched off.
Step 1: Set the Start/Stop Switch
Move the Start/Stop switch to the START position.
Step 2: Set the Choke to Run
Move the choke lever to the Run position.
Indicator: Vertical line
This allows maximum airflow into the engine.
Step 3: Start the Engine
Pull the starter cord firmly until the engine starts and runs normally.
If the engine has cooled significantly, repeat the Cold Start Procedure instead.
Starting Control Guide
| Control | Function |
|---|---|
| Start/Stop Switch | Starts or stops the engine |
| Primer Bulb | Draws fuel into the carburettor before starting |
| Full Choke (Horizontal Line) | Used for cold starting |
| Half Choke (Diagonal Line) | Intermediate position after the engine first fires |
| Run (Vertical Line) | Normal operating position |
| Starter Cord | Turns the engine over to start it |
Frequently Asked Questions
Why won't my petrol strimmer start?
Common causes include stale fuel, an incorrect fuel mixture, insufficient priming, the wrong choke position, or a fouled spark plug.
How many times should I press the primer bulb?
Approximately 7 times, or until fuel is visible and any air bubbles have disappeared.
Should I use the choke when the engine is warm?
No. For a warm engine, the choke should normally remain in the Run position.
Why does the engine stop after it first fires?
This is normal during a cold start. Move the choke to the Half Choke position and pull the starter cord again until the engine starts and runs continuously.
Why does the choke return to the run position?
On many petrol strimmers, pressing the throttle trigger automatically disengages the choke and returns it to the normal Run position.
My Petrol Strimmer/Brush Cutter is not running properly
Quick Answer
If your petrol strimmer or brush cutter is difficult to start, runs unevenly, lacks power, or will not start at all, one of the first components to check is the spark plug. A dirty, worn, or faulty spark plug can prevent the engine from running correctly.
This guide explains how to inspect, clean, and test the spark plug before considering further diagnosis.
⚠️ Safety Notice
Before carrying out any maintenance:
- Switch off the engine and allow it to cool completely.
- Remove the spark plug cap to prevent accidental starting.
- Work in a well-ventilated area away from open flames or ignition sources.
- Wear suitable protective gloves and eye protection.
Common Symptoms
A faulty spark plug may cause the following problems:
- Engine difficult to start
- Engine will not start
- Poor idling
- Misfiring or spluttering
- Loss of power
- Engine cutting out during operation
Tools Required
- Spark plug spanner

- Wire brush (recommended)
- Clean cloth
- Fresh petrol (for cleaning, if required)
Remove the Spark Plug
- Remove the spark plug cap (high-tension lead) from the spark plug.
- Using a spark plug spanner, turn the spark plug anti-clockwise until it can be removed.
- Some resistance is normal, particularly if the spark plug has not been removed previously.
Inspect the Spark Plug
Examine the spark plug for signs of:
- Carbon build-up
- Dirt or oil deposits
- Damaged electrode
- Cracked ceramic insulator
- Excessive wear
A dirty or damaged spark plug may produce a weak spark or prevent the engine from starting altogether.
Cleaning the Spark Plug
If the spark plug is dirty but otherwise undamaged:
- Clean the electrode using a wire brush.
- Alternatively, wipe the spark plug with a clean cloth lightly dampened with petrol.
- Allow the spark plug to dry completely before testing or refitting.
Test the Spark Plug for a Spark
Tip: This test is easier and safer with two people.
- Reconnect the spark plug to the spark plug cap.
- Hold the threaded metal body of the spark plug firmly against a clean, unpainted metal part of the engine to create an earth connection.
- Ensure the Start/Stop switch is in the START position.
- Move to a shaded area where the spark is easier to see.
- Pull the starter cord firmly while observing the tip of the spark plug.
Results
- White or blue spark visible – The spark plug is producing a spark and is likely functioning correctly.
- No spark visible – The spark plug may be faulty, or there may be a fault with the ignition system.
⚠️ Warning: Hold the spark plug using insulated materials where possible and keep hands clear of the electrode to avoid electric shock.
Test with a Different Spark Plug
If you have access to a known working spark plug:
- Connect the replacement spark plug to your machine's spark plug cap.
- Repeat the spark test.
Results
- If the replacement spark plug produces a spark, your original spark plug should be replaced.
- If neither spark plug produces a spark, the fault is likely within the ignition system, such as the ignition coil or associated wiring.
Reinstall the Spark Plug
Once testing is complete:
- Carefully screw the spark plug into the engine by hand to avoid cross-threading.
- Tighten securely using the spark plug spanner.
- Refit the spark plug cap, ensuring it is fully seated.
If the Problem Persists
If the spark plug is working correctly but the engine still runs poorly or will not start, also check:
- The fuel is fresh and mixed to the correct ratio.
- The air filter is clean.
- The fuel filter is not blocked.
- The primer bulb is operating correctly.
- The fuel lines are free from leaks or damage.
If the issue continues after completing these checks, please contact our Technical Support Team for further assistance.
Frequently Asked Questions
Can a dirty spark plug stop my strimmer from starting?
Yes. Carbon deposits or contamination can weaken the spark and prevent the fuel mixture from igniting.
What colour should the spark be?
A healthy spark is usually white or blue and clearly visible in a shaded area.
Can I clean a spark plug instead of replacing it?
If the spark plug is only dirty, it can often be cleaned and reused. However, if it is worn, cracked, or damaged, it should be replaced.
Why is there no spark even with a new spark plug?
If a known working spark plug also fails to produce a spark, the fault may lie with the ignition coil, ignition wiring, or stop switch.
How often should I inspect the spark plug?
The spark plug should be inspected regularly as part of routine maintenance and whenever starting or running problems occur.
My Petrol Strimmer/Brush Cutter is revving too high
Quick Answer
If your petrol strimmer or brush cutter is revving unusually high while idling, the most common causes are the choke remaining engaged, the throttle hold (fast idle) not resetting, or a sticking throttle cable. Follow the checks below before seeking further assistance.
⚠️ Safety Notice
Before carrying out any inspection:
- Switch off the engine and allow it to cool completely.
- Keep hands clear of the cutting attachment.
- Wear suitable protective gloves.
- Do not attempt to adjust the carburettor unless you have the correct tools and experience.
If the cutting head rotates continuously at idle, stop using the machine until the fault has been resolved.
Why Is My Strimmer Revving Too High?
A high idle speed can be caused by:
- The choke remaining engaged
- The throttle hold (fast idle) not resetting
- A sticking or damaged throttle cable
- Incorrect carburettor adjustment
- An air leak within the engine or fuel system
Begin with the simple checks below.
Check the Choke Position
Ensure the choke has fully returned to the Run position.
If the choke remains partially engaged after starting, the engine may run incorrectly and idle at a higher speed than normal.
Reset the Throttle Hold
Many petrol strimmers have a throttle hold or fast-idle feature used during starting.
To reset it:
- Hold the machine securely.
- Press and release the throttle trigger.
- Check whether the engine returns to a normal idle speed.
If the throttle hold has not disengaged, the engine may continue to run at higher revs.
Inspect the Throttle Cable
Check the throttle cable for:
- Kinks
- Twists
- Signs of wear or damage
- Anything preventing the cable from moving freely
The throttle should return smoothly when the trigger is released.
Important: Accessing or replacing the throttle cable may require partial disassembly of the machine. Unauthorised repairs may invalidate your warranty.
Frequently Asked Questions
Why is my petrol strimmer revving too high?
The most common causes are the choke remaining engaged, the throttle hold not resetting, or a sticking throttle cable.
Should the cutting head rotate at idle?
No. The cutting head should remain stationary when the engine is idling correctly.
How do I reset the throttle hold?
Simply press and release the throttle trigger after the engine has started. This normally disengages the fast-idle function.
Can a damaged throttle cable cause high revs?
Yes. A sticking, kinked, or damaged throttle cable can prevent the throttle from returning to its normal idle position.
Can I continue using the machine if it is revving too high?
No. Operating the machine with an excessively high idle speed can be unsafe and may cause damage. The fault should be corrected before further use.
My Petrol Strimmer/Brush Cutter will not idle
Quick Answer
If your petrol strimmer or brush cutter starts but stalls when the throttle trigger is released, the most common causes are stale fuel, a blocked air filter, or incorrect carburettor settings. Before adjusting the carburettor, carry out the basic checks below to rule out common issues.
⚠️ Safety Notice
Before carrying out any maintenance or adjustments:
- Switch off the engine and allow it to cool completely.
- Wear suitable personal protective equipment (PPE), including gloves and eye protection.
- Keep the cutting head clear of people, pets, and objects.
- Carburettor adjustments should only be carried out using the correct tools and by someone with suitable mechanical knowledge.
Incorrect carburettor adjustment can affect engine performance and may cause engine damage.
Why Won't My Strimmer Idle?
If the engine starts but cuts out when the throttle is released, possible causes include:
- Old or incorrectly mixed fuel
- A blocked or dirty air filter
- Restricted fuel flow
- Incorrect carburettor settings
- General engine wear or maintenance issues
Begin with the simple checks below before attempting any carburettor adjustments.
Preliminary Checks
Check the Fuel
Ensure the fuel is:
- Fresh
- Mixed to the correct ratio recommended by the manufacturer
- Free from contamination
Old or incorrectly mixed fuel can prevent the engine from idling correctly.
Check the Air Filter
Inspect the air filter for dirt and debris.
A blocked air filter restricts airflow and can cause:
- Poor idling
- Loss of power
- Difficult starting
Clean or replace the air filter if necessary.
Check the Fuel Cap
Ensure the fuel cap is fitted correctly and tightened by hand.
The cap should be secure but not overtightened, as this may affect fuel tank ventilation.
Carburettor Adjustment
If the preliminary checks have been completed and the engine still will not idle, the carburettor settings may require adjustment.
Important
⚠️ Carburettor adjustment requires mechanical knowledge and the correct adjustment tool.
Incorrect adjustment can:
- Prevent the engine from idling correctly
- Reduce engine performance
- Cause engine damage
- Invalidate your warranty
If you are unsure, please contact our Technical Support Team before proceeding.
Tools Required
- Carburettor adjustment tool (Pacman type)
Adjustment Procedure
Step 1: Warm Up the Engine
Start the engine and allow it to reach normal operating temperature before making any adjustments.
Step 2: Locate the Adjustment Screws
The carburettor contains the following adjustment screws:
| Screw | Function |
|---|---|
| L (Low Speed) | Controls idle and low-speed operation |
| H (High Speed) | Controls maximum engine speed |
| T / LA (if fitted) | Controls idle speed |
Step 3: Adjust the Low-Speed (L) Screw
Slowly adjust the L screw until:
- The engine idles smoothly.
- The engine no longer stalls when the throttle is released.
- The cutting head remains stationary while idling.
Make small adjustments and allow the engine to stabilise after each adjustment.
Step 4: Check the High-Speed (H) Screw
With the engine running at full throttle:
- Turn the H screw anti-clockwise until the engine begins to lose maximum RPM.
- Slowly turn the screw clockwise until the engine reaches maximum RPM and runs smoothly.
- Release the throttle and confirm the engine returns to a stable idle.
If the Problem Persists
If the engine still will not idle after completing these checks:
- Check the fuel filter for blockages.
- Inspect the spark plug for wear or carbon deposits.
- Check the fuel lines for leaks or damage.
- Ensure the carburettor is clean and free from contamination.
If you are unable to resolve the issue, please contact our Technical Support Team for further assistance.
Frequently Asked Questions
Why does my strimmer stall when I release the throttle?
This is commonly caused by stale fuel, a blocked air filter, incorrect carburettor settings, or restricted fuel flow.
What does the L screw adjust?
The L (Low Speed) screw controls the fuel mixture during idle and low engine speeds.
Should the cutting head rotate while idling?
No. The cutting head should remain stationary when the engine is idling correctly.
Can old fuel cause poor idling?
Yes. Old or incorrectly mixed fuel is one of the most common causes of poor engine performance and unstable idling.
Can I adjust the carburettor myself?
Only if you have the correct adjustment tool and experience. Incorrect adjustments can worsen engine performance and may invalidate your warranty.
My Petrol Strimmer/Brush Cutter will not rev up
Quick Answer
If your petrol strimmer or brush cutter starts and idles correctly but struggles to accelerate, will not reach full engine speed, or cuts out when the throttle is applied, the most common causes are stale fuel, a blocked air filter, restricted fuel flow, or incorrect carburettor settings. Follow the checks below before attempting any carburettor adjustments.
⚠️ Safety Notice
Before carrying out any maintenance or adjustments:
- Switch off the engine and allow it to cool completely before inspecting the machine.
- Wear suitable personal protective equipment (PPE), including gloves and eye protection.
- Keep the cutting head clear of people, pets, and obstacles.
- Carburettor adjustments should only be carried out using the correct tools and by someone with suitable mechanical knowledge.
Incorrect carburettor adjustment can affect engine performance and may cause engine damage.
Why Won't My Strimmer Rev Up?
If the engine starts but struggles to accelerate or reach full speed, possible causes include:
- Old or incorrectly mixed fuel
- A blocked or dirty air filter
- Restricted fuel flow
- Incorrect carburettor adjustment
- A blocked fuel filter
- A worn or fouled spark plug
Begin with the basic checks below before adjusting the carburettor.
Preliminary Checks
Check the Fuel
Ensure the fuel is:
- Fresh
- Mixed to the correct ratio recommended by the manufacturer
- Free from contamination
Old or incorrectly mixed fuel can reduce engine performance and prevent the engine from reaching full RPM.
Check the Air Filter
Inspect the air filter for dirt and debris.
A blocked air filter can restrict airflow, causing:
- Poor acceleration
- Reduced engine power
- Engine hesitation
- Excessive exhaust smoke
Clean or replace the air filter if necessary.
Check the Fuel Cap
Ensure the fuel cap is fitted correctly and tightened by hand.
A loose fuel cap can affect fuel delivery, while an overtightened cap may restrict tank ventilation on some models.
Carburettor Adjustment
If the preliminary checks have been completed and the engine still will not rev up, the carburettor settings may require adjustment.
Important
⚠️ Carburettor adjustment requires mechanical knowledge and the correct adjustment tool.
Incorrect adjustment can:
- Reduce engine performance
- Cause engine damage
- Increase exhaust emissions
- Invalidate your warranty
If you are unsure, please contact our Technical Support Team before proceeding.
Tools Required
- Carburettor adjustment tool (Pacman type)

Adjustment Procedure
Step 1: Warm Up the Engine
Start the engine and allow it to reach normal operating temperature.
Carburettor adjustments should always be made with a warm engine.
Step 2: Locate the Adjustment Screws
The carburettor contains the following adjustment screws:
| Screw | Function |
|---|---|
| L (Low Speed) | Controls idle and low-speed operation |
| H (High Speed) | Controls maximum engine speed and acceleration |
| T / LA (if fitted) | Controls idle speed |
Step 3: Check the Low-Speed Setting
Before adjusting the high-speed circuit, ensure the L screw is correctly adjusted so that:
- The engine idles smoothly.
- The engine does not stall.
- The cutting head remains stationary while idling.
An incorrect low-speed setting can affect acceleration.
Step 4: Adjust the High-Speed (H) Screw
With the engine running at full throttle:
- Turn the H screw anti-clockwise until the engine begins to lose maximum RPM.
- Slowly turn the screw clockwise until the engine reaches maximum RPM and runs smoothly.
- Test the throttle response to ensure the engine accelerates cleanly without hesitation or bogging down.
Avoid over-adjusting the H screw, as excessive engine speed can damage the engine.
If the Problem Persists
If the engine still struggles to rev after completing these checks:
- Inspect the fuel filter for blockages.
- Check the spark plug for wear or carbon deposits.
- Inspect the fuel lines for leaks or damage.
- Ensure the carburettor is clean and free from contamination.
If the problem remains:
- Contact our Technical Support Team for further diagnosis.
- If appropriate, a replacement carburettor may be recommended.
- If your machine is within its warranty period, our team can advise on inspection and repair options.
Frequently Asked Questions
Why does my strimmer idle but not rev up?
This is commonly caused by stale fuel, a blocked air filter, restricted fuel flow, or incorrect carburettor settings.
What does the H screw adjust?
The H (High Speed) screw controls the fuel mixture at higher engine speeds and affects maximum RPM and acceleration.
Should I adjust the H screw before the L screw?
No. Always ensure the engine idles correctly before adjusting the high-speed circuit.
Can old fuel affect engine performance?
Yes. Old or incorrectly mixed fuel can cause hesitation, loss of power, and poor acceleration.
My Petrol Strimmer head/Brush Cutter blade will not move
Quick Answer
If the engine is running but the strimmer head or brush cutter blade is not rotating, the most common causes are an incorrectly fitted cutting attachment, a loose shaft connection, or a damaged internal drive shaft. Follow the checks below to identify the cause before contacting Technical Support.
⚠️ Safety Notice
Before carrying out any inspection:
- Switch off the engine and allow it to cool completely.
- Remove the spark plug cap to prevent accidental starting.
- Wear suitable protective gloves.
- Ensure the cutting attachment has come to a complete stop before handling it.
Never inspect rotating components while the engine is running unless specifically instructed, and always keep hands, clothing, and loose objects well clear of moving parts.
Why Won't My Strimmer Head or Brush Cutter Blade Rotate?
If the engine runs normally but the cutting attachment does not rotate, possible causes include:
- Incorrectly installed strimmer head or brush cutter blade
- Upper and lower shaft sections not fully engaged
- Damaged or disconnected drive shaft
- Worn or damaged drive mechanism
Carry out the following checks in order.
Check the Head or Blade Installation
Ensure the strimmer head or brush cutter blade has been fitted correctly.
If you have recently changed between a strimmer head and a brush cutter blade:
- Check that all washers, spacers, and retaining nuts are fitted in the correct order.
- Ensure the cutting attachment is tightened securely.
- Refer to the relevant fitting guide for your model if required.
An incorrectly installed cutting attachment may prevent drive from being transmitted correctly.
Check the Shaft Connection
If the cutting attachment is installed correctly but still does not rotate:
- Inspect the connection between the upper and lower shaft sections.
- Ensure both shaft sections are fully inserted and securely locked together.
- Check that the coupling mechanism has engaged correctly.
A loose or incorrectly assembled shaft connection can prevent power from reaching the cutting attachment.
Inspect the Drive Shaft
If the previous checks do not resolve the issue, inspect the internal drive shaft.
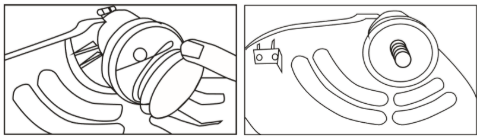
Step 1: Separate the Shaft Sections
Carefully disconnect the upper and lower shaft sections following the instructions in your user manual.
Step 2: Check the Lower Shaft
- Rotate the strimmer head or brush cutter blade by hand.
- Observe the internal drive shaft inside the lower shaft tube.
The drive shaft should rotate smoothly and consistently.
Results:
- If the drive shaft does not rotate smoothly, the lower shaft assembly is likely damaged and may require replacement.
- If it rotates correctly, continue with the next check.
Step 3: Check the Upper Shaft
⚠️ Warning: Take extra care when carrying out this inspection. Keep hands, clothing, and loose objects well away from moving parts.
- Start the engine.
- Observe the internal drive shaft inside the upper shaft tube.
- Apply the throttle gently while watching the drive shaft.
Results:
- If the drive shaft rotates normally, the fault is likely within the lower shaft assembly or cutting head.
- If the drive shaft does not rotate, the upper shaft assembly, clutch, or drive mechanism may have failed and require repair or replacement.
If the Problem Persists
If the cutting attachment still does not rotate after completing these checks:
- Stop using the machine.
- Do not dismantle the clutch or gearbox unless you have the appropriate mechanical knowledge.
- Contact our Technical Support Team for further diagnosis and repair advice.
Frequently Asked Questions
Why is my engine running but the strimmer head isn't turning?
The most common causes are an incorrectly fitted cutting attachment, a disconnected shaft coupling, or a damaged drive shaft.
Can a loose shaft connection stop the cutting head from rotating?
Yes. If the upper and lower shaft sections are not correctly connected, power cannot be transferred from the engine to the cutting attachment.
How can I tell if the drive shaft is damaged?
Separate the shaft sections and rotate the cutting head by hand. If the internal drive shaft does not turn smoothly, it may be bent, worn, or broken.
Could the clutch be causing the problem?
Yes. If the upper drive shaft does not rotate when the engine is accelerated, the clutch or another part of the drive mechanism may have failed.
Can I continue using the machine if the cutting head doesn't rotate?
No. Continuing to run the engine may cause further damage. Identify and rectify the fault before using the machine again.
My Petrol Strimmer/Brush Cutter is experiencing excessive vibration
Quick Answer
If your petrol strimmer or brush cutter is vibrating excessively during operation, the most common causes are loose fixings, a damaged cutting attachment, a bent drive shaft, or an internal engine fault. This guide explains the checks you can safely perform to help identify the source of the vibration.
⚠️ Safety Notice
Before carrying out any inspection:
- Switch off the engine and allow it to cool completely.
- Remove the spark plug cap to prevent accidental starting.
- Wear suitable protective gloves.
- Ensure the cutting attachment has come to a complete stop before handling it.
Do not continue using the machine if excessive vibration persists, as this may lead to further damage or increase the risk of injury.
Why Is My Strimmer Vibrating Excessively?
Excessive vibration usually originates from one of two areas:
- The engine housing
- The drive shaft assembly
Identifying where the vibration is coming from will help determine the appropriate repair.
Check the Cutting Attachment
Before inspecting the machine further, check that the strimmer head or brush cutter blade is:
- Correctly fitted
- Securely tightened
- Free from damage
- Not excessively worn or unbalanced
A damaged or incorrectly fitted cutting attachment can cause significant vibration during operation.
Vibration from the Engine Housing
If the vibration appears to be coming from the engine:
- Switch off the engine and allow it to cool.
- Inspect all visible screws, bolts, and fasteners.
- Tighten any loose fixings where necessary.
If all fasteners are secure and the vibration continues, the cause may be an internal engine fault.
Possible causes include:
- Worn engine components
- Damaged crankshaft bearings
- Loose flywheel
- Internal mechanical wear or failure
These faults require inspection by a qualified technician.
Vibration from the Shaft Assembly
If the vibration appears to come from the shaft, inspect the internal drive shaft for damage or wear.
Step 1 – Separate the Shaft Sections
Disconnect the upper and lower shaft sections following the instructions in your user manual.
Step 2 – Check the Lower Shaft
- Rotate the strimmer head or brush cutter blade by hand.
- Observe the internal drive shaft through the lower shaft tube.
The drive shaft should rotate smoothly without excessive movement or wobble.
Results:
- If the drive shaft rotates unevenly or appears bent, the lower shaft assembly may require replacement.
- If it rotates smoothly, continue with the next check.
Step 3 – Check the Upper Shaft
⚠️ Warning: Keep hands, clothing, and loose objects well away from moving parts during this inspection.
- Start the engine.
- Observe the internal drive shaft through the upper shaft tube.
- Apply the throttle gently while watching the shaft rotate.
Results:
- If the drive shaft rotates smoothly, the vibration may be caused by the cutting attachment or gearbox.
- If the drive shaft vibrates, wobbles, or does not rotate correctly, the upper shaft assembly or drive mechanism may require replacement.
If the Problem Persists
If excessive vibration continues after completing these checks:
- Stop using the machine immediately.
- Inspect the cutting attachment for damage or imbalance.
- Do not dismantle the engine, clutch, or gearbox unless you have suitable mechanical experience.
Please contact our Technical Support Team for further diagnosis and assistance.
Frequently Asked Questions
Why is my petrol strimmer vibrating so much?
The most common causes are a damaged cutting attachment, loose fixings, a bent drive shaft, or an internal engine fault.
Can a damaged strimmer head cause vibration?
Yes. A cracked, worn, or incorrectly fitted strimmer head or brush cutter blade can create excessive vibration during operation.
How do I know if the drive shaft is damaged?
Separate the shaft sections and observe the internal drive shaft while rotating the cutting attachment by hand. If it wobbles, binds, or rotates unevenly, it may be damaged.
Is it safe to continue using a vibrating strimmer?
No. Excessive vibration can indicate a mechanical fault and may lead to further damage or injury if the machine continues to be used.
When should I contact Technical Support?
If all visible components are secure and the vibration persists, or if you suspect an internal engine or drive shaft fault, contact Technical Support for further assistance.
My Petrol Strimmer/Brush Cutter pull cord is faulty
Quick Answer
If the pull cord on your petrol strimmer or brush cutter is stuck, will not retract, feels loose, or will not pull out, the starter assembly is likely to be faulty and may need replacing. If only the pull handle is damaged, you may only need to replace the starter grip.
⚠️ Safety Notice
Before carrying out any maintenance:
- Switch off the engine and allow it to cool completely.
- Remove the spark plug cap to prevent accidental starting.
- Wear suitable protective gloves.
- This repair involves removing the clutch assembly and should only be carried out by someone with suitable mechanical knowledge and the correct tools.
Incorrect reassembly may result in damage to the machine or prevent drive from being transmitted to the cutting attachment.
Common Pull Cord Faults
You may need to replace the starter assembly if the pull cord:
- Will not pull out properly
- Is stuck
- Feels loose
- Does not retract correctly
- Snaps during use
Replacing the starter assembly is a complex repair because it requires removal of the clutch assembly using specialist tools.
If you are not confident carrying out this repair, we recommend contacting our Warranty & Technical Support Team to discuss repair options. Alternatively, a qualified mechanic or technician can carry out the repair.
Replacement starter assemblies are available through our website or via our Spares Helpline.
Damaged Pull Handle Only
If only the plastic pull handle has broken and:
- The starter cord is still intact
- The cord retracts correctly
you may only need to replace the starter grip, rather than the complete starter assembly.
Replacement starter grips are available through our website or via our Spares Helpline.
Replacing the Starter Assembly
⚠️ Warning: This procedure is complex and requires specialist tools and mechanical experience.
Tools Required
- Torx bit (T25/T27)
- Piston stop
- Precision pliers
- Clutch removal tool
Parts Required
- Replacement starter assembly
Removal Procedure
Step 1 – Remove the Starter Housing
- Using a T25/T27 Torx bit, remove the four screws securing the cone to the starter assembly.
- Carefully separate the cone from the starter assembly.
Step 2 – Lock the Engine
- Remove the spark plug.
- Install a piston stop to prevent the engine from turning.
Step 3 – Remove the Clutch
- Remove the retaining bolt from the centre of the clutch housing.
- Remove the retaining circlip from the top of the clutch.
- Using a clutch removal tool, rotate the clutch anti-clockwise.
- Remove the clutch and the backing plate.
Step 4 – Remove the Starter Assembly
- Remove the four screws securing the starter assembly.
- Remove the two screws securing the rear engine cover (black plastic cover).
- Unclip the retaining clip joining the two covers on the right-hand side.
- Remove the starter assembly.
Step 5 – Install the Replacement
Fit the new starter assembly into position.
Reassembly
Reassemble the machine by reversing the removal procedure.
During reassembly ensure:
- The clutch is tightened correctly.
- The retaining circlip is securely refitted.
- The upper shaft is correctly aligned with the clutch housing.
- The main drive shaft engages fully with the drive slot.
⚠️ Important: If the drive shaft is not correctly engaged, the engine will run normally but the strimmer head or brush cutter blade will not rotate.
If You Are Unsure
If you do not have the required tools or mechanical experience, do not attempt this repair.
Please contact our Warranty & Technical Support Team for advice on repair options or replacement parts.
Frequently Asked Questions
Why won't my pull cord retract?
A pull cord that will not retract is usually caused by a faulty starter assembly or damaged recoil spring.
Can I replace just the pull handle?
Yes. If only the plastic handle is damaged and the cord still retracts normally, you only need to replace the starter grip.
Why is replacing the starter assembly difficult?
The repair requires removal of the clutch assembly using specialist tools and correct reassembly of the drive components.
What happens if the drive shaft is not fitted correctly?
The engine may start and run normally, but no drive will be transmitted to the strimmer head or brush cutter blade.
How do I change the strimmer head to a brush cutter blade
Quick Answer
To convert your petrol machine from a grass trimmer head to a brush cutter blade, you must lock the gear head, remove the trimmer head assembly, and install the blade using the correct washers and locking method. The blade nut is typically left-hand threaded (tightened anti-clockwise).
⚠️ Safety Notice
Before starting:
- Switch off the engine and allow it to cool completely.
- Remove the spark plug cap to prevent accidental starting.
- Wear protective gloves and eye protection.
- Ensure the cutting attachment is stationary before handling.
Incorrect installation can result in serious injury or damage to the machine.
Changing from Grass Trimmer to Brush Cutter Blade
Step 1 – Lock the Gear Head
- Align the slot in the flanged washer with the slot in the gear head.
- Insert the supplied hex wrench through both slots.
- This locks the gear head and prevents it rotating during removal.

Step 2 – Remove the Trimmer Head
- Unscrew the grass trimmer head by turning it clockwise.
- Remove the cupped washer and flanged washer.
- Keep these parts safe for future reassembly.
Step 3 – Install the Brush Cutter Blade
- Fit the flanged washer onto the shaft with the hollow side facing the gear head.
- Place the brush cutter blade onto the flanged washer.
- Ensure the raised centre of the washer passes through the blade hole.
- Confirm the blade sits flat and is correctly aligned.
Step 4 – Fit the Retaining Hardware
- Install the cupped washer with the raised centre facing away from the blade.
- Fit the blade retaining nut onto the shaft.
Step 5 – Secure the Blade
- Reinsert the hex wrench into the locking slots to hold the gear head in place.
- Tighten the blade nut by turning it anti-clockwise (left-hand thread).
- Tighten securely using the supplied tool.
⚠️ The blade must be firmly secured before operation.
Changing Back to Grass Trimmer
To convert back:
- Lock the gear head using the hex wrench.
- Remove the blade nut, cupped washer, and blade.
- Refit the flanged washer.
- Screw the trimmer head onto the shaft by turning it anti-clockwise.
- Tighten securely before use.
Changing from Brush Cutter to Grass Trimmer
Step 1 – Remove the Blade
- Hold the flange in place using an Allen key.
- Unscrew the retaining nut by turning it clockwise.
- Remove the blade.
- Remove and retain any shield washers.

Step 2 – Fit the Trimmer Head
- Continue holding the flange with the Allen key.
- Screw the trimmer head onto the shaft by turning it anti-clockwise.
- Tighten fully until secure.
- Remove the Allen key.
Refitting the Brush Cutter Blade
If reinstalling the blade:
- Remove the trimmer head.
- Refit shield washers in the correct order.
- Position the blade correctly on the shaft.
- Lock the flange with an Allen key.
- Tighten the retaining nut anti-clockwise.

Important Notes
- Always ensure the gear head is locked before loosening or tightening components.
- Blade nuts are usually left-hand threaded (anti-clockwise tighten).
- Incorrect assembly may cause vibration, poor performance, or unsafe operation.
Frequently Asked Questions
Why does the blade nut tighten anti-clockwise?
Because brush cutter blades typically use a left-hand thread to prevent loosening during operation.
Do I need special tools to change the head?
Yes. Most models require a locking hex wrench or Allen key to hold the gear head in place.
Can I use the machine if the blade is slightly loose?
No. A loose blade is extremely dangerous and must be tightened securely before use.
What happens if I install the washers incorrectly?
Incorrect washer placement can cause vibration, blade movement, or damage to the gear head.
How do I fit the strimmer head to my Petrol Strimmer/Brush Cutter
Quick Answer
To fit or replace the strimmer line, you need to remove the spool, wind new line evenly onto the spool, refit it into the housing, and reinstall the cover. Correct winding direction and even tension are essential for reliable feeding during use.
⚠️ Safety Notice
Before carrying out any maintenance:
- Switch off the engine and allow it to cool completely.
- Remove the spark plug cap to prevent accidental starting.
- Wear protective gloves when handling the spool and line.
- Ensure the cutting head is fully stationary.
Table of Contents
- Removing the Spool
- Fitting New Strimmer Line
- Refitting the Spool
- Reinstalling the Cover
- Adjusting the Line Length
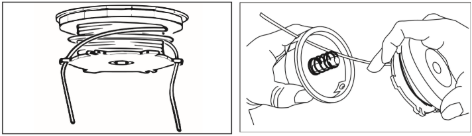
Removing the Spool
- Remove the spool cover / bolt cap.
- Carefully lift off the cover and set aside the spring. Take care not to lose it.
- Remove the spool from the housing.
- Discard any remaining or worn strimmer line.
Fitting New Strimmer Line
- Create a small bend or nick in the centre of the new line.

- Hook the centre of the line into the slot in the middle of the spool.
- Wind the line evenly onto both sides of the spool, following the directional arrows marked on the spool.
Ensure the line is wound neatly and evenly to prevent tangling or poor feeding during operation.
Refitting the Spool
- Secure both ends of the line into the retaining slots on the spool.
- Feed both line ends through the eyelets in the spool housing.
- Carefully insert the spool and spring back into the housing.
- Pull both line ends gently through the eyelets while pushing the spool into position.
- Press the spool down and rotate it clockwise until it reaches the stop point.
- Hold the spool in position and rotate it back slightly to ensure it locks securely.

Reinstalling the Cover
- Refit the spool cover / bolt cap.
- Tighten by hand only.
Do not overtighten, as this may damage the spool housing or restrict line feed.
Adjusting the Line Length
- Press the underside of the spool firmly by hand.
- Pull both line ends evenly until they extend slightly beyond the edge of the safety guard.
- Ensure both sides are equal in length and feed freely.
The strimmer head is now ready for use.
Frequently Asked Questions
Why does my strimmer line keep breaking?
This is usually caused by cutting thick material, incorrect line thickness, or worn spool components.
Why won’t the line feed automatically?
The line may be wound incorrectly, the spool may be jammed, or the eyelets may be blocked with debris.
Do I need to use a specific type of line?
Yes. Always use the diameter and type of line recommended for your model.
Why is one side of the line longer than the other?
This usually means the line was not wound evenly onto the spool during installation.
How do I replace the fuel lines on my Petrol Strimmer/Brush Cutter
Quick Answer
If your petrol strimmer or brush cutter is difficult to start, leaking fuel, or running inconsistently, the fuel lines may be cracked, blocked, or detached. Replacing them involves feeding new fuel hoses through the tank, fitting the fuel filter, and correctly routing both inlet and outlet lines to the carburettor.
⚠️ Safety Notice
Before starting:
- Switch off the engine and allow it to cool completely.
- Work in a well-ventilated area away from ignition sources.
- Drain any remaining fuel before beginning the repair.
- Wear protective gloves, as fuel can irritate skin.
Petrol is highly flammable. Take care at all times.
When Do Fuel Lines Need Replacing?
Fuel lines may need replacing if:
- The engine is difficult to start
- Fuel is leaking from the machine
- The engine cuts out under load
- The fuel lines are cracked, brittle, or damaged
- The primer bulb does not fill correctly
Before You Begin
Most machines use two fuel hoses:
- Outlet hose (longer hose) – supplies fuel from tank to carburettor
- Inlet hose (shorter hose) – returns fuel or connects to primer system
To make installation easier, you can soften the hoses by placing them in warm water for a few minutes before fitting.
Replacing the Fuel Lines
Step 1 – Feed the Fuel Line Through the Tank
- Locate the fuel line opening in the fuel tank.
- Insert the new fuel line from outside the tank.
- Push it through until a small section is visible inside the fuel filler opening.

Step 2 – Fit the Fuel Filter
- Through the fuel filler opening, pull enough line through to access the inside of the tank.
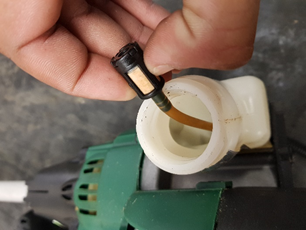
2. Attach the fuel filter securely to the end of the outlet fuel line.
3. Pull the fuel line back so the filter sits freely inside the tank.
4. Ensure the filter can move freely and reach fuel at all times.
Step 3 – Connect the Fuel Lines
- Route the outlet hose (longer line) to the carburettor fuel inlet.
- Connect the inlet hose (shorter line) to the primer bulb or return connection (depending on model).
- Ensure both hoses are pushed firmly onto their fittings.

Step 4 – Check the Installation
Before refilling or starting the machine:
- Ensure the fuel filter is fully inside the tank.
- Confirm the filter moves freely without restriction.
- Check that hoses are not kinked, twisted, or pinched.
- Verify all connections are tight and secure.
Final Checks
Before starting the engine:
- Check for any signs of fuel leakage.
- Confirm correct routing of both fuel lines.
- Ensure the primer bulb fills correctly when pressed.
- Refill with the correct fuel mixture if required.
Frequently Asked Questions
Why do fuel lines fail?
Fuel lines commonly degrade over time due to fuel exposure, heat, and age, becoming brittle or cracked.
What happens if fuel lines are connected incorrectly?
Incorrect routing can cause starting issues, fuel starvation, or flooding.
Can I reuse old fuel lines?
No. Once fuel lines become hard, cracked, or loose, they should always be replaced.
Why does my primer bulb not fill after replacing fuel lines?
This usually indicates incorrect hose routing or a loose connection at the carburettor or primer bulb.
How do I prepare my Petrol Strimmer/Brush Cutter for Winter
This video is for the CDB30 grass trimmer, however it still applies in principle to other 2-stroke engines.
Quick Answer
Proper winter storage prevents fuel degradation, carburettor blockages, and starting issues. To prepare your petrol strimmer or brush cutter, you must empty the fuel tank, run the engine until the carburettor is empty, and store the machine in a dry environment.
⚠️ Safety Notice
Before starting:
- Switch off the engine and allow it to cool completely.
- Work in a well-ventilated area away from ignition sources.
- Drain fuel carefully, as petrol is highly flammable.
- Wear suitable protective gloves.
Why Winter Storage Matters
Leaving fuel in your machine over winter can cause:
- Fuel degradation and varnish build-up
- Blocked carburettor jets
- Difficult starting in spring
- Poor engine performance
Following the correct storage procedure helps maintain engine reliability.
Winter Storage Procedure
Step 1 – Empty the Fuel Tank
Drain all remaining fuel from the fuel tank.
Fuel left inside the tank over long periods can deteriorate and form deposits, especially in cold conditions where condensation may occur.
Step 2 – Empty the Carburettor
- Start the engine.
- Allow it to run until it stops naturally.
This ensures that the carburettor is cleared of remaining fuel.
Step 3 – Clear Remaining Fuel
- Press the primer bulb several times to circulate any remaining fuel.
- Attempt to restart the engine.
If the engine does not start, the fuel system has been sufficiently emptied for storage.
Step 4 – Store the Machine
Store your strimmer or brush cutter in a:
- Clean
- Dry
- Well-ventilated location
Where possible:
- Keep the machine out of direct sunlight
- Avoid damp or humid environments
- Store off the ground to prevent moisture exposure
Before Using the Machine Again
At the start of the next season:
- Inspect the machine for damage or wear
- Check fuel lines and primer bulb condition
- Fill with fresh, correctly mixed 2-stroke fuel
- Prime and start the engine as normal
Frequently Asked Questions
Why do I need to empty the carburettor for winter storage?
Fuel left in the carburettor can evaporate and leave deposits that block internal jets, preventing the engine from starting.
Can I store fuel in the tank over winter?
No. Fuel can degrade over time and cause starting and performance issues.
Do I need to clean the machine before storage?
It is recommended to clean the cutting head and remove debris to help prevent corrosion and wear.
What happens if I forget to winterise my strimmer?
You may experience hard starting, poor running, or a blocked carburettor that requires cleaning or replacement.