
Lawnmowers
Lawnmowers
Cordless Lawnmowers Products

How do I start my Cordless Lawnmower
Quick Answer
To start a cordless lawnmower, you need a charged and correctly fitted battery, a properly inserted safety key, and both the safety button and start lever engaged at the same time. If the mower does not start, it is usually due to battery or safety key issues.
Important: Always ensure the mower is assembled correctly and kept on a stable surface before starting.
Overview
Cordless lawnmowers require multiple safety interlocks before the motor will run. These are designed to prevent accidental starting and ensure safe operation.
If the mower does not start, the most common causes are:
- Flat or uncharged battery
- Battery not fully inserted
- Safety key not installed correctly
Step-by-Step Guide
Step 1: Check the battery charge
Before starting:
- Ensure the battery is fully charged
- Press the battery test button to check remaining power
- If the indicator shows low charge, recharge fully before use
Important: A low battery may prevent the mower from starting or cause it to cut out.
Step 2: Insert the battery
- Lift the battery compartment cover
- Slide the battery into the slot
- Push firmly until you hear a clear click
The click confirms the battery is securely locked in place.
Step 3: Insert the safety key
- Locate the safety key slot on the mower
- Insert the safety key fully into position
- Ensure it clicks into place
Important: The mower will not operate without the safety key correctly fitted.
Step 4: Start the lawnmower
- Stand behind the mower in a safe operating position
- Press and hold the safety button on the switch box
- While holding the button, pull the start lever towards the handle
The motor will start once both controls are engaged.
Step 5: Stop the lawnmower
- Release the start lever
- The motor will stop immediately
Troubleshooting Tips
Mower will not start
Check the following:
- Battery is fully charged
- Battery is correctly inserted and locked in place
- Safety key is fully inserted
Motor stops during use
Possible causes:
- Battery charge is low
- Grass is blocking the cutting deck
- Safety components are not fully engaged
Important Safety Information
- Always insert the safety key before starting
- Never attempt to operate without the battery installed
- Keep hands and feet away from the blade at all times
- Remove battery and safety key before cleaning or maintenance
Important: The mower will not operate unless all safety systems are correctly engaged.
Frequently Asked Questions
Why won’t my cordless lawnmower start?
This is usually caused by a flat battery, incorrectly inserted battery, or missing safety key.
Do I need the safety key every time?
Yes. The mower will not start without it.
Why does my mower stop after a few seconds?
This is usually due to low battery charge or a blockage under the deck.
Can I force the mower to start without the safety button?
No. All safety controls must be used together for operation.
How do I assemble the handles on my Cordless Lawnmower
Quick Answer
To assemble the handles on a cordless lawnmower, you typically connect the lower handles to the mower body first, then attach the upper handles using bolts, washers, and quick-release clamps. Once tightened and locked, the handle should be firm, aligned, and free from movement.
Important: Always ensure the mower is switched off and the battery is removed before assembly.
Before You Start
Before assembling the handles:
- Switch the lawnmower off
- Remove the battery
- Ensure the safety key (if fitted) is removed
- Place the mower on a stable, flat surface
Important: Do not attempt assembly while the mower can be powered.
Step-by-Step Guide
Step 1: Attach the lower handles
- Locate the lower handle sections
- Align them with the mounting points on the mower body
- Insert the handles fully into position
- Apply firm pressure if required for correct seating
If applicable:
- Secure using the supplied screws or fixing points
- Tighten until secure but do not overtighten
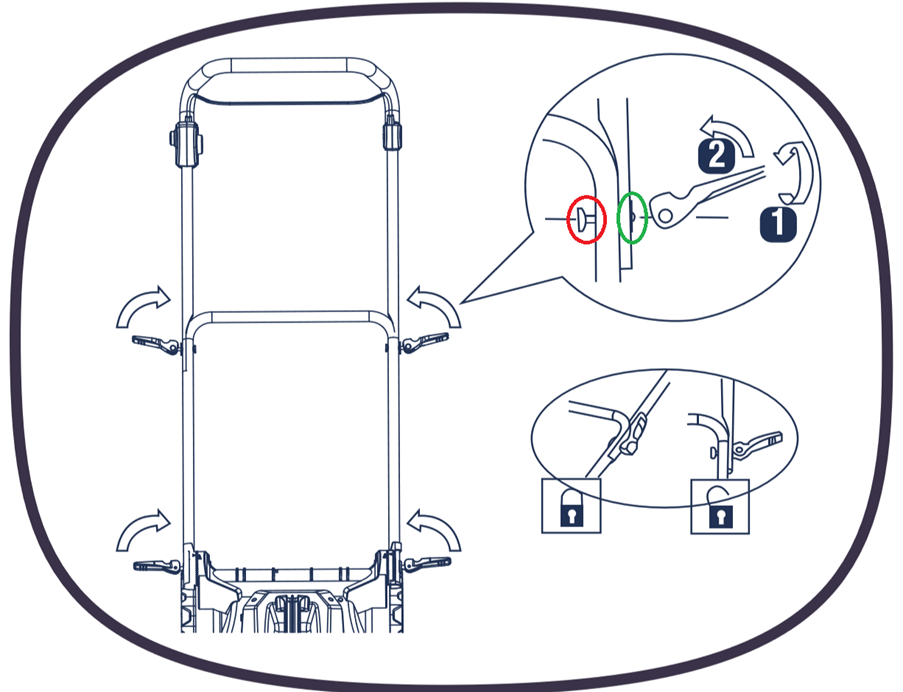
Step 2: Assemble the upper handles
Most models use a quick-release clamp system.
1. Insert the bolt
- Insert the bolt from the inside of the handle frame
- Ensure the bolt head sits on the inside of the handle
2. Fit the washer
- Place the washer on the outside of the handle
- Ensure it sits flat against the frame
3. Attach the quick-release clamp
- Screw the clamp lever onto the bolt thread
- Tighten until the handle is secure and stable
4. Lock the handle
- Press the quick-release lever down
- This locks the handle firmly into position
Important: The handle should feel solid with no movement once locked.
Step 3: Final checks
Before use, confirm:
- Both sides of the handle are evenly aligned
- All bolts and clamps are fully tightened
- No movement or wobble is present in the frame
- Cables (if present) are routed safely and not trapped
Important Information
- Always assemble on a stable surface
- Ensure all fixings are secure before use
- Do not operate the mower if the handle is loose
- Check tightness periodically during the season
Important: A loose handle can affect safety and control of the mower.
Frequently Asked Questions
Why is my handle wobbling after assembly?
This usually means the quick-release clamp or bolts are not fully tightened.
Do I need tools to assemble the handle?
Most models only require the supplied bolts, washers, and clamp system.
Can I adjust the handle height?
Yes, many models allow height adjustment using the clamp or fixing points.
What should I do if parts don’t align?
Check that all sections are correctly oriented and fully inserted before tightening.
My Cordless Lawnmower has changes to the motor speed
Quick Answer
If your cordless lawnmower motor speed changes during use, this is completely normal. The mower uses an automatic variable speed system that adjusts power based on grass conditions to optimise cutting performance and battery life.
Important: No manual speed control is required for normal operation.
Overview
Your cordless lawnmower is designed with intelligent motor control. This system automatically adjusts power output depending on the load on the blade.
It helps to:
- Improve cutting performance in different grass conditions
- Extend battery runtime
- Reduce unnecessary power use in lighter cutting conditions
Normal Motor Speed Behaviour
During use, you may notice the following:
1. Motor speeds up
- Occurs in thick, long, or damp grass
- The mower increases power automatically
- This helps maintain cutting efficiency
2. Motor slows down
- Occurs in light, short, or previously cut grass
- The mower reduces power to conserve battery
- This improves overall runtime
3. Automatic adjustment
- Speed changes happen in real time
- No buttons or settings are required
- Operation is fully automatic
Important Information
- Variable speed is a normal function of the mower
- It is not a fault or performance issue
- The system balances cutting power and battery efficiency
- No user adjustment is needed
Important: The mower is designed to adapt automatically to grass conditions.
Frequently Asked Questions
Is changing motor speed a fault?
No. It is part of the mower’s normal operation system.
Can I turn off variable speed?
No. The system is automatic and cannot be manually disabled.
Why does it sound different in thick grass?
The motor increases power automatically, which changes the sound level.
Does this affect battery life?
Yes, but in a positive way. It helps optimise runtime based on cutting conditions.
My wheel keeps falling off my Cordless Lawnmower
Quick Answer
If your lawnmower wheel keeps falling off, it is usually caused by a loose or missing washer, circlip, or locking ring on the axle. Re-securing these components correctly will normally fix the issue.
Important: Always switch off the mower and remove the battery before carrying out any repairs.
Before You Start
Before working on the wheels:
- Switch the lawnmower off
- Remove the battery
- Remove the safety key (if fitted)
- Place the mower on a stable surface
Important: Never attempt repairs while the mower is powered.
How to Fix This Problem
Step 1: Remove the wheel trim
- Carefully lever off the wheel trim or hub cap
- Set it aside safely
Step 2: Check internal components
Inspect inside the wheel assembly:
- Locate the flat washer and circlip (or locking ring on smaller models)
- Check for loose or rattling parts
- Ensure the metal bearing is correctly seated inside the wheel
Important: Missing or misaligned components will cause the wheel to come off during use.
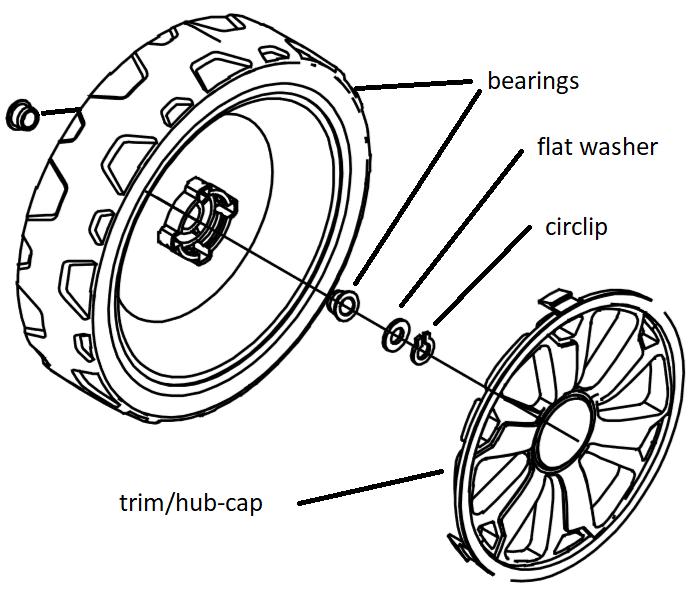
Step 3: Refit the wheel
- Place the wheel back onto the axle
- Fit the flat washer first
- Fit the circlip securely against the washer and bearing
- Ensure everything sits tightly in place
Important: The wheel should feel secure with no sideways movement.
Step 4: Refit the wheel trim
- Push the hub cap back into position
- Ensure it clicks or seats firmly
Smaller Models (e.g. 32cm)
Some smaller mowers use a slightly different setup:
- No separate washer and circlip
- Uses a single locking ring instead
- Bearings may be built into the wheel
Follow the same general steps, ensuring the locking ring is fully secured.
Alternative Resolution: Star Washers
If the wheel still comes loose, star washers may be required.
How to fit star washers:
- Place the wheel onto the axle
- Position the star washer on the axle
- Press evenly around the washer edges to secure it
- Ensure it is firmly seated without causing wheel friction
- Refit the wheel cover
Important: The star washer must be secure but must not restrict wheel movement.
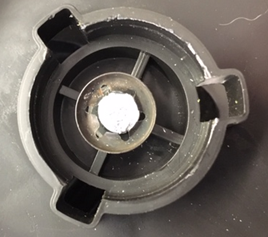
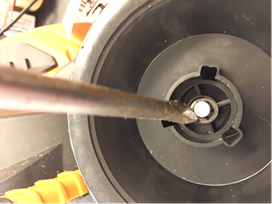
If Parts Are Missing
If any of the following are missing:
- Washer
- Circlip or locking ring
- Wheel bearings
Contact Technical Support for replacement parts where available.
Important Information
- Vibration during use can loosen wheel components over time
- Correct assembly is essential for safe operation
- Loose wheels can affect stability and safety
- Always check wheel security before each use
Frequently Asked Questions
Why does my wheel keep falling off?
This is usually caused by missing or loose retaining parts such as washers or circlips.
Can I still use the mower if a wheel is loose?
No. The mower should not be used until the wheel is securely fixed.
Do I need tools to fix the wheel?
Most models can be repaired without tools, but a flat tool may help remove the hub cap.
What are star washers for?
They provide additional grip on the axle to help prevent the wheel from coming loose.
How do I do a safety key check on my Cordless Lawnmowers
Quick Answer
If your cordless lawnmower is not starting, it may be due to an issue with the safety key not correctly activating the internal microswitch. You can test this by checking whether the microswitch is being properly engaged when the safety key is inserted.
Important: Always ensure the mower is switched off and the battery is removed before carrying out any checks.
Before You Start
Before performing any safety key checks:
- Switch the lawnmower off
- Remove the battery
- Remove the safety key
- Ensure the mower is on a stable surface
Important: Do not attempt this check while the mower is powered.
How to Perform a Safety Key Check
Step 1: Remove the safety key
- Take out the safety key tab from the mower
- Set it aside safely
Step 2: Prepare the controls
- Hold the start/stop button on the handle
- Pull and hold the operating lever
Important: This simulates normal starting conditions.
Step 3: Test the microswitch
- Locate the small black microswitch inside the safety key slot
- Using a long insulated tool (e.g. flat-head screwdriver), gently press the microswitch down
If the mower starts when the microswitch is pressed, this indicates the safety key is not correctly engaging it.
What This Means
If the mower starts when manually pressing the microswitch:
- The safety key is likely misaligned or not functioning correctly
- It is not making proper contact with the switch
If the Issue Persists
If your safety key is not working correctly:
- Contact our Technical Support Team
- Request a replacement safety key
- Provide your model number for compatibility
Important: Do not operate the mower without a properly functioning safety key fitted.
Temporary Advice
In some cases, the safety key may not be correctly shaped or aligned. If advised by support:
- It may be adjusted slightly to ensure proper contact with the microswitch
Important: This should only be done if instructed by Technical Support.
Important Information
- The safety key is a critical safety component
- The mower will not operate without correct engagement
- Never bypass safety systems permanently
- Always ensure the microswitch is fully activated by the key
Frequently Asked Questions
Why won’t my lawnmower start?
It may be due to the safety key not correctly engaging the internal microswitch.
Can I use the mower without the safety key?
No. The mower is designed not to operate without it.
How do I know if the safety key is faulty?
If the mower starts when manually pressing the microswitch but not with the key inserted, the key is likely faulty or misaligned.
What should I do if I need a replacement key?
Contact Technical Support to request a replacement compatible with your model.
My Cordless Lawnmower is vibrating excessively
Quick Answer
Excessive vibration is usually caused by a damaged, unbalanced, or incorrectly fitted blade. In most cases, inspecting and replacing the blade will resolve the issue.
Important: Always switch off the mower and remove the battery before carrying out any checks or maintenance.
Before You Start
Before inspecting the mower:
- Switch the lawnmower off
- Remove the battery
- Remove the safety key (if fitted)
- Ensure the mower is on a stable surface
Important: Never attempt to inspect or remove the blade while the mower is powered.
Possible Causes
Excessive vibration is commonly caused by:
- Blade damage from hitting an obstacle
- A rusty or worn blade
- Damage to the blade adapter or sheared lugs
- Incorrectly fitted blade
If any of these issues are present, the blade will need to be replaced.
If the Blade Is Damaged and Stuck
If the blade is damaged and difficult to remove, follow these steps carefully:
Step 1: Secure the blade
- Use a sturdy wooden block or similar object
- Wedge it firmly to prevent the blade from moving
Important: The blade must be fully immobilised before loosening the bolt.
Step 2: Loosen the blade bolt
- Use a socket wrench on the blade fixing bolt
- Turn the bolt anti-clockwise
- Apply steady force at first, then gradually loosen
Important: Do not rush this step—some bolts may be tightly secured.
Step 3: Remove and replace the blade
- Remove the bolt completely
- Take off the damaged blade
- Fit the new blade onto the blade adapter
- Refit and tighten the bolt securely
Important: Ensure the blade is correctly aligned before tightening.
If the Issue Persists
If vibration continues after replacing the blade:
- Stop using the mower immediately
- Contact our Technical Support Team
- Provide your model number and details of the issue
Further inspection may be required if the problem is not blade-related.
Important Information
- Always inspect blades regularly for damage or wear
- Replace blades if they show signs of impact or rust
- Ensure correct tightening of the blade bolt before use
- Never operate the mower with a damaged or loose blade
Frequently Asked Questions
Why is my mower vibrating so much?
This is usually caused by a damaged, bent, or unbalanced blade.
Can I still use the mower if it vibrates?
No. Excessive vibration can indicate a safety issue and should be investigated immediately.
Do I need tools to remove the blade?
Yes, a socket wrench is typically required to remove the blade bolt.
What causes blade damage?
Most commonly, contact with stones, sticks, or other hard objects in the garden.
My Cordless Lawnmower is having issues with the height adjustment
Quick Answer
If your cordless lawnmower height adjustment is stiff or not working correctly, it is usually caused by debris build-up or lack of lubrication in the adjustment mechanism. Cleaning and lightly lubricating the lever typically resolves the issue.
Important: Always switch off the mower and remove the battery before carrying out any checks or adjustments.
Before You Start
Before working on the height adjustment system:
- Switch the lawnmower off
- Remove the battery
- Remove the safety key (if fitted)
- Place the mower on a stable surface
Important: Never attempt adjustments while the mower is powered.
Possible Causes and Basic Checks
1. Debris build-up
Check the height adjustment lever area for:
- Grass clippings
- Dirt or compacted debris
- Blockages around moving parts
Remove any debris carefully before testing again.
2. Stiff lever
If the lever feels difficult to move:
- Apply a light spray of suitable lubricant (e.g. WD-40)
- Move the lever back and forth to distribute it evenly
Important: Do not over-lubricate the mechanism.
3. Mechanical connection check
Inspect the connection between:
- Height adjustment lever
- Rear axle
- Connecting rod
Ensure all parts are properly aligned and not disconnected or loose.
How to Adjust Cutting Height
Follow these steps:
Step 1: Pull the lever
- Pull the cutting height adjustment lever outwards
Step 2: Select height
- Move the lever forwards or backwards
- Choose the required cutting height
Step 3: Lock in position
- Return the lever to its locked position
- Ensure it is securely seated
Important: The lever must click or lock firmly into place.
Cutting Height Range
- Position 1 to 7: typically 25mm to 75mm
- Some models may vary depending on design
Model Variation Note
- 32cm cordless mowers usually have 5 cutting positions
- All other sizes typically have 7 cutting positions
Important: Always refer to your specific model specifications if unsure.
If the Issue Persists
If the height adjustment still does not work correctly:
- Stop using the mower
- Contact our Technical Support Team
- Provide your model number and a description of the issue
Further inspection may be required.
Important Information
- Keep the adjustment system clean and free of debris
- Lubricate only when necessary
- Ensure the lever is fully locked before use
- Do not force the mechanism if it is stuck
Frequently Asked Questions
Why is my height adjustment lever stiff?
This is usually caused by grass build-up or lack of lubrication in the mechanism.
Can I still use the mower if the height adjustment is stuck?
No. The mower should not be used until the issue is resolved.
What lubricant should I use?
A light multi-purpose spray lubricant such as WD-40 is typically suitable.
Why won’t the lever stay in place?
This may indicate a misalignment or mechanical issue with the connecting rod or axle system.
How do I replace the upper handle on Cordless Lawnmower
Quick Answer
The upper handle on most cordless lawnmowers can be replaced by removing the fixing screws on both sides, detaching the stop/start handle assembly, and then refitting it onto the new handle in reverse order.
Important: Always switch off the mower and remove the battery before starting any work.
Before You Start
Before replacing the handle:
- Switch the lawnmower off
- Remove the battery
- Remove the safety key (if fitted)
- Place the mower on a stable surface
Important: Never attempt maintenance while the mower is powered.
Replacement Overview
The upper handle is a replaceable component. Ensure you have the correct replacement part before starting. These can typically be ordered via the website or through the support helpline.
Step-by-Step Guide
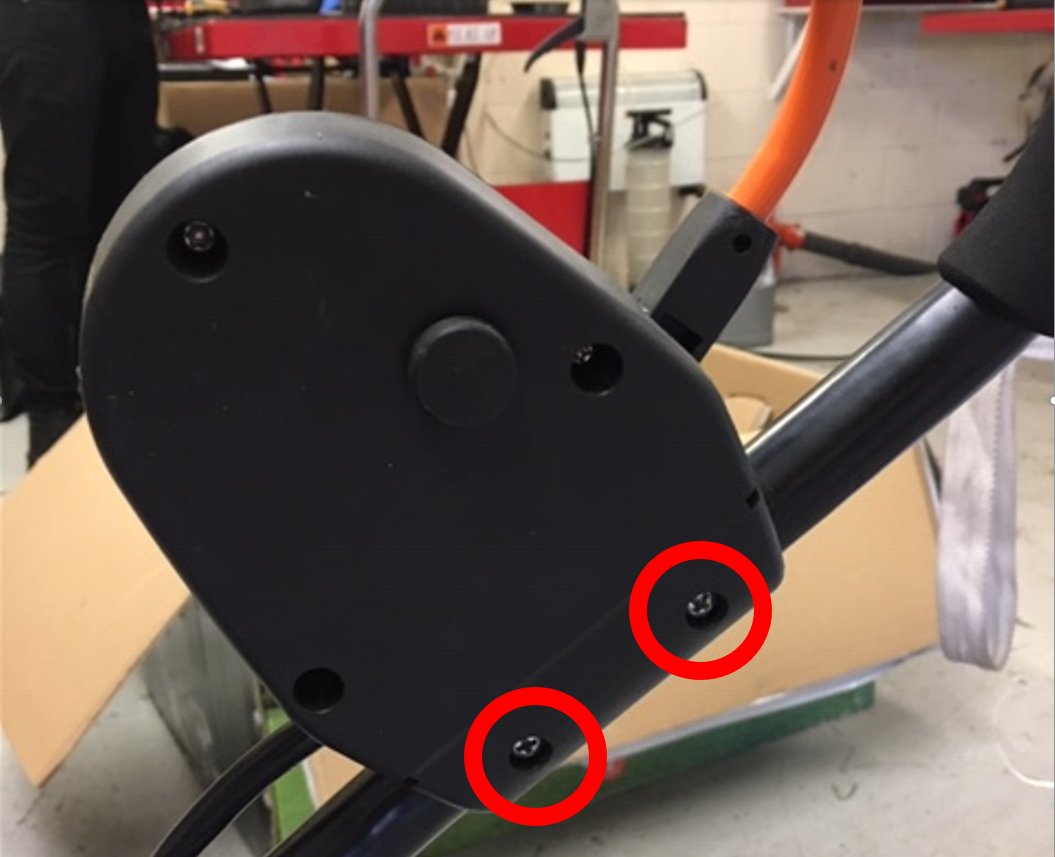
Step 1: Remove right-hand side fixings
- Locate the two lower screws on the right-hand (RH) side of the handle
- Carefully unscrew and remove them
- Gently separate the plastic housing around the handle
Important: Do not force the plastic parts apart—ease them gently to avoid damage.
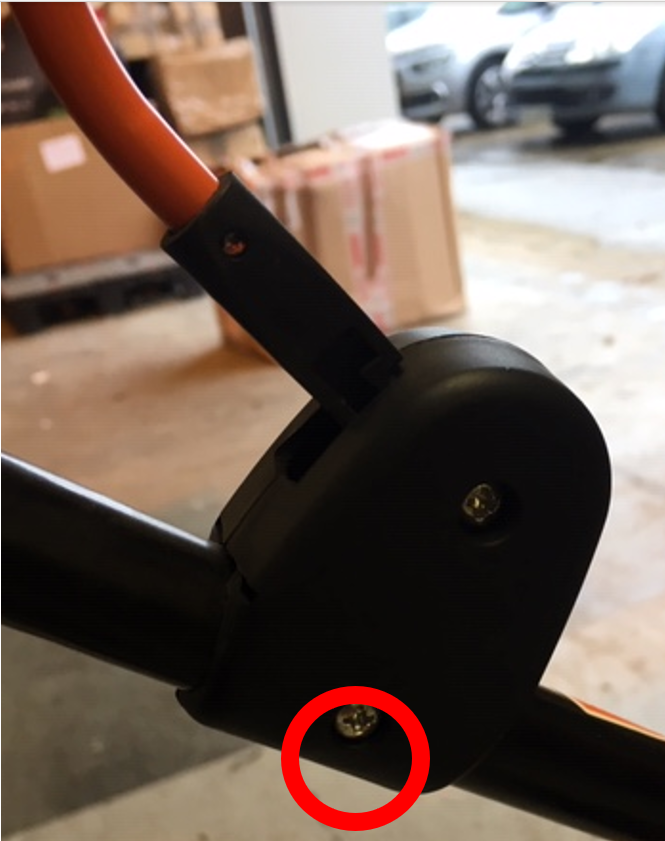
Step 2: Remove left-hand side fixing
- Locate the lower screw on the left-hand (LH) side of the handle
- Unscrew and remove it
- Gently separate the plastic housing around the handle
Important: Ensure all fixings are fully removed before attempting to detach the handle.
Step 3: Detach the control assembly
- The stop/start handle assembly should now be free
- Carefully remove it from the old upper handle
Important: Take care not to strain or damage the wiring or trigger mechanism.
Step 4: Fit to the new upper handle
- Position the stop/start handle assembly onto the new handle
- Align all mounting points correctly
Step 5: Reassemble
- Reinsert and tighten the left-hand screw
- Reinsert and tighten the right-hand screws
- Ensure all plastic housings are properly closed and secured
Important: Check both sides are firmly fixed and there is no movement.
Final Checks
Before use:
- Ensure all screws are tightened securely
- Check the handle is stable and correctly aligned
- Confirm the stop/start mechanism operates correctly
- Reinstall the battery and safety key only when assembly is complete
Frequently Asked Questions
Why does my upper handle feel loose after fitting?
This usually means one or more screws have not been fully tightened or the plastic housing is not correctly seated. Recheck both sides and ensure all fixings are secure.
Can I reuse my old screws when fitting the new handle?
Yes, in most cases the original screws are reused unless they are damaged or worn. Replace them only if they no longer grip securely.
What if the stop/start switch does not work after reassembly?
Check that the control assembly is correctly aligned and not pinched or twisted. Also ensure no wiring has been trapped during reassembly.
Do I need any special tools to replace the upper handle?
A standard screwdriver is usually sufficient. Some models may require a specific bit depending on screw type.
Can I use the mower if the handle is slightly misaligned?
No. The handle must be properly aligned and secured before use to ensure safe operation.
How do I start my 108V Cordless Lawnmower
Quick Answer
To start the 108V cordless lawnmower, ensure the battery is charged and fully inserted, the safety key is fitted, then power on the mower and engage the safety lock and motor switch bar. The mower will not operate unless all safety systems are correctly activated.
Important: Always check the battery and safety key before attempting to start.
Before You Start
Before operating the mower, confirm:
- The battery is fully charged
- The battery is fully inserted until it clicks into place
- The safety key is correctly inserted and activated
- The mower is placed on stable ground
Important: The mower will not start unless both the battery and safety key are correctly fitted.
Step-by-Step Start Guide
Step 1: Power and safety checks
- Press the battery test button to confirm charge level
- Insert the battery fully into the mower
- Ensure you hear a clear click when locked
- Insert the safety key fully into position
- Confirm a click from the internal microswitch
Important: Both components must be properly seated for operation.
Step 2: Power on the mower
- Press and hold the central ON/OFF button for approximately 2 seconds
- The green LED light will illuminate
- This confirms the mower is powered on
Step 3: Start the cutting blade
- Press and hold the safety lock button
- While holding it, pull the motor switch bar towards the handle
- The blade will begin rotating
Important: The mower will only run while both controls are engaged.
Step 4: Stop the mower
- Release the motor switch bar
- The blade will stop immediately
Self-Propel Function
The self-propel system can be used with or without blade operation.
Option A: Self-propel without cutting
- Turn the power ON
- Push the rear drive switch bar towards the handle
- Hold to activate movement
- Release to stop
Option B: Self-propel with cutting
- Start the mower using the normal procedure
- Hold the front bail bar
- Engage the rear drive bar
- The mower will cut and move forward simultaneously
Important: Always maintain full control of the mower during operation.
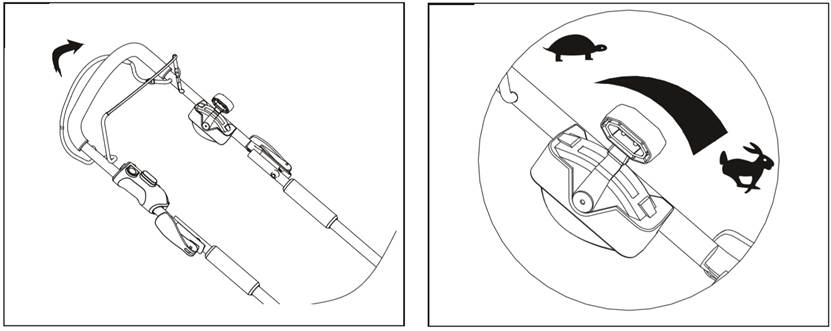
Adjusting Self-Propel Speed
- Use the speed adjustment lever
- Move forwards or backwards to increase or decrease speed
- The lever allows continuous variable control
Important Information
- Always ensure the safety key is fitted before starting
- Never attempt to bypass safety switches
- Keep hands and feet away from the blade at all times
- Remove battery and safety key before maintenance
Important: The mower will not operate unless all safety systems are correctly engaged.
Frequently Asked Questions
Why won’t my 108V mower start?
This is usually caused by the battery not being fully charged, incorrectly inserted, or the safety key not being fitted correctly.
Do I need to press the ON/OFF button every time?
Yes. The power button must be activated before engaging the safety lock and motor switch bar.
Why does the mower stop when I release the handle?
This is a safety feature designed to stop the blade immediately when controls are released.
Can I use self-propel without cutting?
Yes. The self-propel system can operate independently of the cutting blade.
What should I do if the LED does not turn on?
Check the battery connection, charge level, and safety key installation.
My 108V Cordless Lawnmower has changes to the Motor Speed
Quick Answer
The 108V cordless lawnmower features an intelligent automatic variable speed system that adjusts the motor speed to match the cutting conditions. The motor will increase speed in thicker grass to provide more cutting power and reduce speed in lighter grass to help maximise battery runtime.
Tip: Changing motor speed during use is normal and does not indicate a fault.
How the Automatic Variable Speed System Works
Your 108V cordless lawnmower is designed to automatically adjust its motor speed based on the resistance it encounters while mowing.
This intelligent system helps to:
- Provide extra power when cutting long or dense grass
- Reduce energy consumption in lighter cutting conditions
- Maximise battery runtime
- Deliver consistent cutting performance
No manual adjustment is required.
Normal Motor Speed Behaviour
During operation, you may notice that:
- The motor speeds up when cutting thick, long or wet grass
- The motor slows down when cutting shorter or less dense grass
- The motor speed changes automatically as you move across your lawn
- The changes happen without any user input
This is normal operation and is part of the mower's intelligent power management system.
Why Does the Motor Speed Change?
The automatic speed control continuously monitors the workload placed on the motor.
When more cutting power is needed, the mower automatically increases motor speed.
When less power is required, it reduces motor speed to:
- Improve battery efficiency
- Extend operating time
- Reduce unnecessary power consumption
This allows the mower to deliver the right amount of power exactly when it is needed.
When Should I Be Concerned?
Motor speed changes are expected during normal use.
However, if you notice any of the following, further investigation may be required:
- The motor repeatedly stops while cutting normal grass
- The mower loses power completely
- The motor speed fluctuates excessively without cutting grass
- Warning lights or battery fault indicators are displayed
If any of these symptoms occur, please contact our customer service team via Live Chat or submit a support ticket.
Important Information
- Automatic variable motor speed is a standard feature of the 108V cordless lawnmower.
- No manual speed control is required.
- The system is designed to optimise both cutting performance and battery life.
- Motor speed will vary depending on grass length, density and cutting conditions.
Frequently Asked Questions
Why does my lawnmower speed up and slow down?
This is normal. The automatic variable speed system adjusts the motor speed according to the amount of power needed to cut the grass.
Is there something wrong with my mower if the motor speed changes?
No. Variable motor speed is a normal operating feature designed to improve performance and extend battery runtime.
Can I manually control the motor speed?
No. The motor speed is automatically controlled by the mower's intelligent power management system.
Does changing motor speed save battery life?
Yes. Reducing the motor speed when less power is needed helps maximise battery runtime without compromising cutting performance.
Why does the mower run faster in long grass?
Longer or denser grass creates more resistance, so the mower automatically increases motor speed to provide additional cutting power.
My 108V Cordless Lawnmower Is Vibrating Excessively
Overview
Excessive vibration in your 108V cordless lawnmower is most commonly caused by an unbalanced, loose, or damaged blade. This usually happens after the blade has struck hard objects such as stones, roots, or hidden debris in the lawn.
Damage to the blade, blade adapter, or mounting lugs can also affect balance and lead to vibration during operation. If any damage is present, the blade must be replaced before further use.
Step-by-Step Guide
Step 1: Switch Off and Secure the Mower
Before any inspection:
- Turn the mower off completely
- Remove the battery
- Remove the safety key (if fitted)
- Ensure the mower cannot start accidentally
Important: Never inspect or work on the blade while the mower has power connected.
Step 2: Inspect the Blade
Carefully check the blade for:
- Cracks or bends
- Rust or excessive wear
- Signs of impact damage
Also inspect the blade adapter and mounting lugs for:
- Shearing
- Looseness
- Visible damage
Important: If any damage is found, the blade must be replaced.
Step 3: Remove a Stuck or Tight Blade (If Required)
If the blade cannot be removed easily:
Secure the blade
- Use a strong wooden block or similar object
- Wedge it firmly to stop the blade moving
Loosen the blade bolt
- Use a socket wrench on the central fixing bolt
- Turn anti-clockwise to loosen
- Apply steady force and continue gradually
Remove the blade
- Remove the bolt completely
- Carefully lift off the blade
- Inspect the mounting area for debris or damage
Step 4: Fit the Replacement Blade
- Align the new blade correctly on the adapter
- Ensure it sits flush and correctly positioned
- Refit the blade bolt
- Tighten securely using a socket wrench
Important: Incorrect fitting can cause further vibration or damage.
Step 5: Final Safety Check
Before use:
- Confirm blade is firmly secured
- Ensure no tools or debris remain in the mower
- Reinsert the battery and safety key
- Test the mower on short grass first
Important Information
- Vibration is most commonly caused by blade damage or imbalance
- Always replace damaged blades immediately
- Never operate the mower with a loose blade
- Always perform checks with the battery removed
Frequently Asked Questions
Why is my lawnmower vibrating so much suddenly?
This is usually due to a damaged, bent, or unbalanced blade, often caused by hitting stones or hard objects while mowing.
Can I keep using the mower if it vibrates slightly?
No. Continued use can damage the motor and increase safety risk. The blade should be inspected immediately.
Do I need to replace the blade if it is only slightly bent?
Yes. Even minor bends can cause imbalance and excessive vibration.
What if the blade bolt keeps coming loose?
The blade may not be seated correctly or the adapter may be worn. Refit and tighten securely, and inspect for damage.
What should I check first?
Always check the blade condition and ensure the battery and safety key are removed before anything else.
My 108V Cordless Lawnmower is having issues with the height adjustment
Quick Answer
If you are having difficulty adjusting the cutting height on your 108V cordless lawnmower, first check that the height adjustment lever, rear axle and connecting rod are correctly connected and free from damage. The cutting height is adjusted using the central height adjustment lever and can be set between 25 mm and 75 mm.
Tip: Always adjust the cutting height with the lawnmower switched off and the batteries removed.
Before You Start
Before inspecting the height adjustment mechanism:
- Switch the lawnmower off
- Remove all batteries from the mower
- Place the mower on a flat, stable surface
Always:
- Wear protective gloves
- Ensure the mower cannot roll while carrying out checks
Important: Never attempt to adjust the cutting height while the mower is running.
How to Check the Height Adjustment Mechanism
Follow these steps to identify the cause of the problem.
1. Inspect the adjustment mechanism
Check the following components for damage, disconnection or obstruction:
- Height adjustment lever
- Rear axle
- Connecting rod
Ensure all parts are correctly connected and move freely.
[Insert image of height adjustment mechanism]
2. Adjust the cutting height
To change the cutting height:
- Pull the cutting height adjustment lever outwards
- Move the lever forwards or backwards to the desired position
- Release the lever into the selected notch
- Ensure the lever is fully secured before using the mower
The mower offers seven cutting height positions.
[Insert image of height adjustment lever]
3. Check the cutting height range
The available cutting heights are:
| Position | Cutting Height |
|---|---|
| 1 | 25 mm |
| 2 | 33 mm |
| 3 | 41 mm |
| 4 | 49 mm |
| 5 | 57 mm |
| 6 | 66 mm |
| 7 | 75 mm |
Always ensure the lever locks securely into the selected position.
If the Height Adjustment Still Doesn't Work
If the lever will not move, will not lock into position, or the cutting height does not change:
- Check for grass, dirt or debris around the adjustment mechanism
- Inspect the linkage for damage or bending
- Contact our customer service team via Live Chat or submit a support ticket for further assistance
Important Maintenance Tips
- Remove grass and debris from the height adjustment mechanism after each use
- Do not force the adjustment lever if it is stiff
- Always adjust the cutting height on level ground
- Check the linkage periodically for wear or damage
- Store the mower in a clean, dry location
Frequently Asked Questions
Why won't my lawnmower height adjustment lever move?
The mechanism may be obstructed by grass or debris, or one of the linkage components may have become disconnected or damaged.
How many cutting height settings does the mower have?
The mower has seven cutting height positions, ranging from 25 mm to 75 mm.
Should I remove the batteries before adjusting the cutting height?
Yes. Always switch the mower off and remove the batteries before making any adjustments.
What should I do if the lever won't lock into position?
Inspect the adjustment mechanism for dirt, damage or disconnected components. If the issue continues, contact our customer service team for assistance.
How do I do a battery and charger check on my 108V Cordless Lawnmower
Quick Answer
If your 108V cordless lawnmower is not operating correctly, first check that the battery is fully charged and the charger is functioning correctly. The battery and charger both feature LED indicators that show the charging status, remaining battery capacity, and any faults.
Tip: Charge the battery fully before first use and recharge it as soon as the battery indicator shows a low charge.
Before You Start
Before checking the battery and charger:
- Switch the lawnmower off
- Remove the battery pack from the mower
- Inspect the battery and charger for any visible damage
Important: Only use the charger supplied with or recommended for your 108V cordless lawnmower.
Charging the Battery Pack
Follow these steps to charge the battery correctly.
1. Connect the charger
Plug the charger into a suitable mains power supply.
The red LED on the charger will illuminate to indicate that power is connected.
[Insert image of charger connected to mains]
2. Insert the battery
Align the grooves on the battery pack with the raised ribs inside the charger.
Press the battery down firmly until it is fully seated.
The battery handle can be lifted to make it easier to carry and position.
[Insert image of battery being inserted into charger]
3. Check the charging indicators
During normal charging:
- The red LED on the charger remains on
- The green LED on the charger flashes continuously
When charging is complete:
- The red LED remains on
- The green LED stays on continuously
This indicates the battery is fully charged and ready for use.
4. If the red LED flashes
A flashing red LED on the charger may indicate:
- A poor connection between the charger and battery
- A problem with the charger cable
- A fault with the battery pack
First, remove and reinstall the battery to ensure it is correctly seated.
If the problem continues and your machine is within warranty, please contact our customer service team via Live Chat or submit a support ticket.
How to Check the Battery Charge
The battery includes a built-in power indicator.
Press the battery indicator button to display the remaining charge.
The green LEDs show the current battery level.
[Insert image of battery power indicator]
Understanding the Battery Indicators
The battery LEDs provide information about the battery's condition.
| Indicator | Meaning |
|---|---|
| Green LEDs illuminated | Remaining battery charge |
| Red LED flashing | Battery charge is very low (below 1%) |
| Red LED flashing after heavy use | Battery temperature is too high |
| Red LED flashing continuously | Battery fault detected |
If the battery becomes too hot, allow it to cool for 10–20 minutes before charging or using it again.
Lithium-Ion Battery Information
Your 108V cordless lawnmower uses a lithium-ion battery.
Unlike older battery technologies:
- Power remains consistent throughout the discharge cycle
- Performance does not gradually decrease during use
- The battery should be recharged once the red LED begins flashing
Important: Do not continue using the lawnmower when the battery indicator shows a very low charge.
If the Battery or Charger Still Isn't Working
If the battery will not charge or the charger indicators show a fault:
- Check all charger connections
- Remove and reinstall the battery
- Allow an overheated battery to cool before charging
- Contact our customer service team if the fault persists
If your machine is within its warranty period, we can advise on repair or replacement options.
Important Battery Care Tips
- Fully charge the battery before first use
- Use only the approved charger
- Do not store the battery fully discharged
- Allow hot batteries to cool before charging
- Store the battery in a cool, dry location
Frequently Asked Questions
How do I know when my battery is fully charged?
When charging is complete, both the red and green LEDs on the charger remain illuminated continuously.
Why is the red light flashing on my charger?
A flashing red LED usually indicates a poor battery connection or a battery fault. Remove and reinstall the battery, then try charging again.
Why is the red light flashing on my battery?
The battery may have a very low charge, be too hot, or have developed a fault. Allow the battery to cool if necessary, then recharge it.
Should I continue using the mower when the battery is low?
No. Recharge the battery as soon as the red LED begins flashing.
Why doesn't the mower gradually lose power?
Lithium-ion batteries provide consistent performance until they are nearly empty. Once the battery reaches a very low charge level, it should be recharged.